Swagger: Open Source Framework To Design & Consume REST APIs

Brief
Nowadays, the application and popularity of Rest API are rising quickly. APIs are useful for users/clients to communicate with the system. The power of making APIs is that your application can work across various devices. You can also make the APIs publically accessible to others, so they can also interact with your APIs and integrate into their website/app. Many popular tools are available for API testing forex, Postman, SoapUI, JMeter etc. But when you integrate swagger in the project, then you don’t need any tools for API testing.
What Is Swagger?
Swagger is an opensource framework for defining your API using a simple language that everyone can understand. It automatically helps in creating attractive and clear documentation of API. It is understandable for developers and non-developers. Anyone can give input into the design of your API because they can see it in swagger UI. Developers always want to work with the APIs that are easy to understand and perform as required.
Advantages Of Swagger
- Swagger is very helpful for an API Design.
- Swagger is saving the time of developers and avoid errors while writing Code.
- Because of this framework, server, client and documentation team can be in synchronization concurrently.
- Clients can quickly understand and consume API without any prior knowledge.
- The Swagger UI framework gives a clear idea of request and response parameter.
Let’s look at what we will require to implement swagger with running example. ASP.NET Core
We will use .NET Core 3.1 for implementing swagger.
You can install SDK and runtime from the given link.
4.5 or higher
Example
In this example, we will get a list of employees with static data using a complex model structure. We will also create post API which will get the complex model structure data from swagger.
Let’s Start:
Step 1: Create an ASP.NET Core web application.
Step 2: Install Swashbuckle.AspNetCore.SwaggerGen, Swashbuckle.AspNetCore.Swagger and Swashbuckle.AspNetCore.SwaggerUI package from Nuget Package Manager.
Step 3: To register a Swagger generator open Startup.cs file, add below line under ConfigureServices method.
services.AddSwaggerGen(c =>
{
c.SwaggerDoc(“v1”, new OpenApiInfo
{
Version = “v1”,
Title = “Swagger demo API”
});
});
Note: You need to include Microsoft.OpenApi.Models namespace
Step 4: Add below code to enable middleware to serve generated Swagger as a JSON endpoint inside the Configure method.
app.UseSwagger();
Step 5: Add below code to enable middleware to serve Swagger-UI (HTML, JS, CSS, etc.) and specifying the Swagger JSON endpoint inside the Configure method.
app.UseSwaggerUI(c =>
{
c.SwaggerEndpoint(“/swagger/v1/swagger.json”, “SwaggerDemo V1”);
c.RoutePrefix = “docs”;
});
Step 6: Open launchSettings.json file under the Properties folder and change the launch URL property to “docs/index.html” so it will open Swagger UI when the project will run.
Step 7: Create Model folder and add EmployeeModel.cs and ApiResponseModel.cs class file
Step 8: Add below code in EmployeeModel.cs file.
public class EmployeeModel
{
public int EmployeeId { get; set; }
public string Name { get; set; }
public string Address { get; set; }
public string Email { get; set; }
public List <DepartmentModel> DepartmentModel { get; set; }
}
public class DepartmentModel
{
public int DepartmentId { get; set; }
public string Name { get; set; }
}
Step 9: Add below code in ApiResponseModel.cs file.
public class ApiResponseModel
{
public int Code { get; set; }
public string Message { get; set; }
public object Data { get; set; }
}
Step 10: Add an API controller with Employee Name inside the controller folder.
Step 11: Add below code in EmployeeController file.
[Route(“GetAllEmployee”)]
[HttpGet]
public IActionResult GetAllEmployee()
{
ApiResponseModel apiResponseModel = new ApiResponseModel();
List<EmployeeModel> employeeModel = new List<EmployeeModel>
{
new EmployeeModel
{
EmployeeId = 1,
Name = “Jacob”,
Address = “US”,
Email = “jacob@gmail.com”,
DepartmentModel = new List<DepartmentModel>
{
new DepartmentModel
{
DepartmentId = 1,
Name = “PHP”
},
new DepartmentModel
{
DepartmentId = 2,
Name = “Dot Net”
}
},
},
new EmployeeModel
{
EmployeeId = 2,
Name = “Harry”,
Address = “US”,
Email = “harry@gmail.com”,
DepartmentModel = new List<DepartmentModel>
{
new DepartmentModel
{
DepartmentId = 3,
Name = “Admin”
},
new DepartmentModel
{
DepartmentId = 4,
Name = “Account”
}
},
}
};
apiResponseModel.Code = (int)HttpStatusCode.OK;
apiResponseModel.Message = “Employee List”;
apiResponseModel.Data = employeeModel;
return Ok(apiResponseModel);
}[Route(“AddEmployee”)]
[HttpPost]
public IActionResult AddEmployee(EmployeeModel model)
{
ApiResponseModel apiResponseModel = new ApiResponseModel();
//Add a record in the DB
apiResponseModel.Code = (int)HttpStatusCode.OK;
apiResponseModel.Message = “Employee added successfully”;
apiResponseModel.Data = new object();
return Ok(apiResponseModel);
}
Step 12: Swagger UI

Step 13: Expand GetAllEmployee API. Clicking the Try it out button will display Execute button. Click on the Execute button and calla specific API and wait for the results.
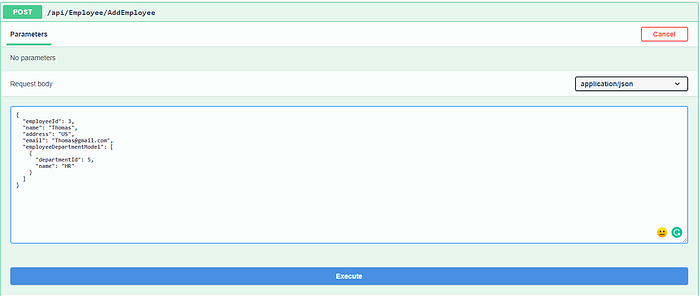
Step 14: Add data in AddEmployee API as per the below image.
Conclusion
Swagger has grown to become the most modern tools for API lifecycle. It has generated high-quality documentation, and it is educating your users, and attracting .net core developers to start new projects with your service. In earlier stages, there was not an industry standard for developing APIs or for documenting them. Swagger appeared as an approach to building APIs and soon became the most popular framework for this purpose.
Originally published at https://www.zealousweb.com.
